Building iDaVIE from source
As a Unity project, there are several steps to follow to compile iDaVIE from source.
Unfortunately, due to the limitations on VR headset drivers on Unix operating systems, we can only support Windows at the moment. We keep a close eye on developments in the VR space and will support Unix as soon as it becomes feasible.
Prerequisites
Install Unity
Download Unity Hub for Windows from Unity’s website and install it.
From the Unity Hub, go the the Installs tab and click Add. Select Unity version
2021.3.xf1(LTS – long term support), where x is the highest number available. Click next, leave the default extras, click next again. Accept the licence and install.Make note of where the Unity Editor executable is installed – by default, this is at
C:\Program Files\Unity\2021.3.xf1\Editor\Unity.exe. Make sure of the version number.
Complete Visual Studio install
Installing a Unity Editor will automatically install the Visual Studio Installer if a version of Visual Studio isn’t installed yet, and run the installer once the Unity Editor install is completed.
On the screen that comes up, select the Desktop development with C++ workload on the left.
On the right, select only the MSVC v142 compiler, the Windows X SDK (where X is your operating system), and the C++ CMake Tools for Windows components.
Click install and wait for it to complete.


Install CMake
Download CMake for Windows and install it. Choose the installer binary distribution for Windows (almost certainly x64) and run it. Follow the instructions provided by the installer.
Make sure you can run
cmakefrom the PowerShell terminal (or command line).
cmake --versionis a good test.
Install vcpkg
Download vcpkg and install it, following the instructions provided on the repository.
Make sure to run the
vcpkg integrate installcommand from the PowerShell terminal once the install has completed.Make sure to note the path to the vcpkg root folder, found at
C:\\vcpkgfor default installations.
Install Steam and SteamVR
To use iDaVIE with any VR headset, we use Steam’s SteamVR application as a bridge.
Download the Steam installer and install it. Create a Steam account if you do not already have one (no cost to create).
Install SteamVR by clicking the “Play Game” button on the SteamVR page.
Download iDaVIE source code
Download the iDaVIE source code from the GitHub repository.
(Optional) You can do this through a Git client, such as GitHub Desktop or Git Extensions, both of which will require Git to be installed.
Run the configuration script
Open a PowerShell terminal in the iDaVIE root folder
Run the
Configure.ps1script. This script takes two arguments: the vcpkg root folder path (as mentioned in step 4), and the Unity executable path (as mentioned in step 1). The default assumption is positional arguments.For example:
.\Configure.ps1 "C:\vcpkg" "C:\Program Files\Unity\2021.3.xf1\Editor\Unity.exe"(Optional) You can specify the vcpkg root with the
-vor-vcpkgflags.(Optional) You can specify the Unity executable with
-uor-unityflags.(Optional) For example:
.\Configure.ps1 -v "C:\vcpkg" -u "C:\Program Files\Unity\2021.3.xf1\Editor\Unity.exe"
Generate SteamVR actions
Open iDaVIE in the Unity Editor.
From the Unity Hub, select the
Addbutton and clickAdd project from disk(only necessary the first time). Navigate to where you downloaded the iDaVIE source code in step 5 and select the iDaVIE folder.Once the project is opened, navigate to
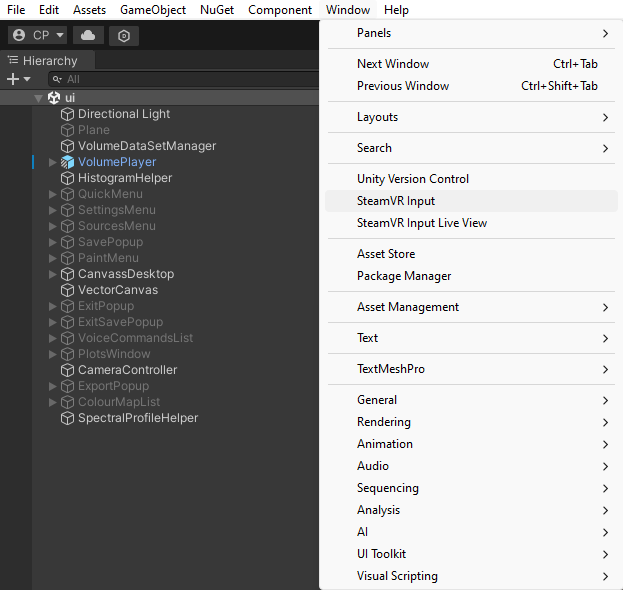
Assets/Scenes/in the Editor’s navigation window (at the bottom) and double-click on the ui.unity file.Under Window->SteamVR Input, click the Save and generate button.

Build iDaVIE
Open iDaVIE in the Unity Editor.
Open the build settings menu under File->Build Settings.
Click on the Player Settings button on the bottom left.
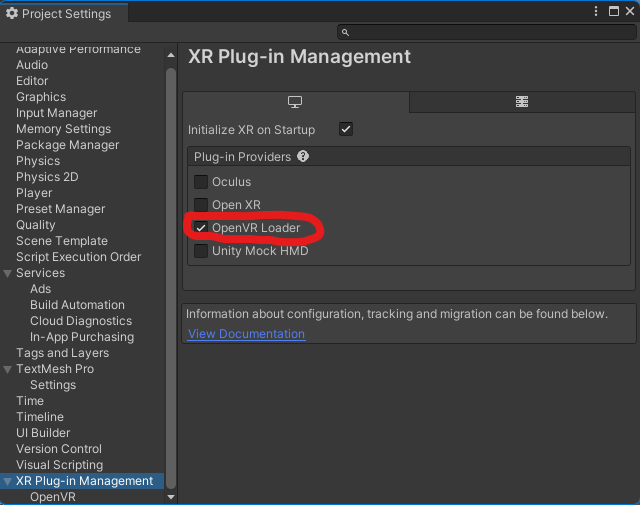
Under XR Plug-in Management (scroll down on the left), make sure that OpenVR Loader is selected in the list of Plug-in Providers.
Click the Build button and select your destination folder.


Troubleshooting
If you get an error about PowerShell permissions when attempting to run the configuration script, you might have to set your PowerShell permissions to Unrestricted. Use the following command:
Set-ExecutionPolicy -ExecutionPolicy Unrestricted -Scope CurrentUser.If you get errors regarding
nmakenot being found when running the configuration script, make sure that you installed the relevant C++ Build components when you install Visual Studio as required by the Unity install.