“How to” demos
In this section we display example videos that should intuitively explain how to use iDaVIE. We made use of a sample data cube of the Fornax galaxy cluster, which is available at this link. The Loni et al. (2021) paper that gives more details about the data is available here. We also use a mask that was created using the HI Source Finding Application (SoFiA).
Explore a cube
Using the controls described in How to interact with the data in VR, the user can zoom in on the data and move the data where needed using the grip buttons.
Then with the A button (if the primary hand is the right) or the X button (if the primary hand is the left) the user can select a region around a point of interest.
The user can then use the voice command “Crop selection” to crop the cube to the region selected.
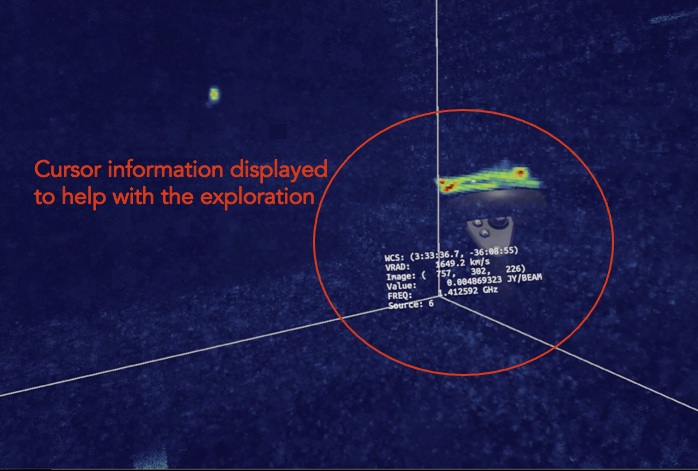
The 3D cursor will provide information about the current voxel under the cursor. If a mask is loaded, then the cursor info will also provide feedback on the identified sources, for example:
The controller can also be used to adjust the minimum and maximum thresholds of the applied colour map of the cube. Using the “Edit min” or “Edit max” voice command, the user can move the primary controller up and down to adjust either threshold:
Take snapshots
iDaVIE allows the user to take a “screenshot” of their current view in the VR environment, saved to OutputsCameraScreenshot_yyyyMMdd_Hmmss.png, where yyyyMMdd_Hmmss is the current timestamp. To do so, the user can do any of the following:
Invoke the quick menu and laser on the camera icon and press the trigger (of the primary hand) while looking in the direction of the area of interest (i.e., if the user looks at the menu when pressing the trigger, then the picture will contain only the menu).
While looking at the area of interest, the user can say “take picture”. If the image was taken sucessfully, the user will receive haptic feedback (vibration) on the primary hand controller.
Create/modify/save a mask
iDaVIE allows the user to create a mask or to modify an existing mask in VR. Both can be done using the “Paint menu” action that can be invoked from the “Quick menu” by lasering the brush icon. Using the functionality available in the “Paint menu”, the user can add or delete mask voxels using the controllers. Once done, the user can save the created/updated mask by either overwriting an existing mask or creating a new one. As also explained in Input & Outputs:
if a mask is loaded and modified in VR, then it can be saved by either overwriting the original mask or as a copy. In the former case, the mask will be saved with the same name of the original mask and in the same directory, while in the latter case, the suffix
-copy.fitswill be added to the original mask name and the edited mask will be saved in the same directory as the original mask (i.e., the edited mask file name will then beoriginalmaskname-copy.fits).if no mask is provided in input, but one is created in iDaVIE, then the created mask is saved in the same directory of the data cube and a suffix
-mask.fitswill be added to the cube name to indicate the mask file (e.g. the created mask file name will then beoriginalcubename-mask.fits).
Interact with catalogs in VR
iDaVIE allows the user to load catalogs from the Desktop GUI and overplot them on the visualised data cube.
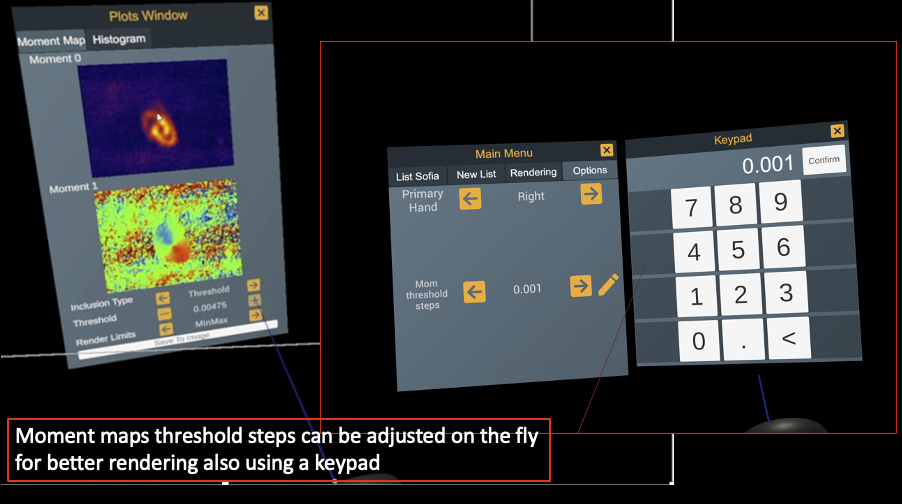
Create statistics and save moment maps
iDaVIE allows the user to investigate the basic statistics of the cube and to create both moment 0 and moment 1 maps of a data cube. The user can create the moment maps for the entire cube or for a single selected region. In case a mask is available, the moment maps thresholds are set by the mask, but they can be changed manually. If no mask is available, then the thresholds should be set manually using the options available in the moment map windows. The moment maps can then be saved as a png or 2D fits image.
Create a movie (using external tools)
We have found the best way to record sessions in iDaVIE is by activating the VR View window in the SteamVR Status menu:

An external screen recorder can then be used to capture the contents of the VR View window. For this, we recommend users download OBS Studio (https://obsproject.com/download). OBS Studio is a free and open-source software for video recording and live streaming. By setting the recording window to the VR View window, users can record their iDaVIE sessions.