How to interact with the data in VR
Sitting or standing?
If you are new to VR when you start using iDaVIE, please take a look at these tips on how to get comfortable while using VR:
You don’t have to stand. For long periods of use, we suggest you sit while ensuring there is enough room to freely move the controllers without colliding with obstacles in the room.
You can walk around the data or move the data towards/around you while comfortably sitting.
We developed the software with care to avoid risks related to motion sickness so we don’t expect problems with this. Nevertheless, if you’ve never used VR before, we suggest you start by moving slowly in the VR environment in order to get used to the new perspective.
How to use the controllers
In this section we provide guidelines on how to use the Oculus controllers as this is our testing scenario. We can provide guidelines upon request on how to use other controllers, e.g. VIVE controllers, instead.
Tip
When setting up the VR system you can choose which hand is your “primary hand” you will use to deliver commands. This can also be set using the iDaVIE Main Menu in the VR GUI. Usually right-handed people will set the right hand to be the primary hand and the left hand to be the secondary hand. The iniverse usually applies to left-handed people. In the following we will describe both scenarios and will refer to primary hand and secondary hands in this sense.
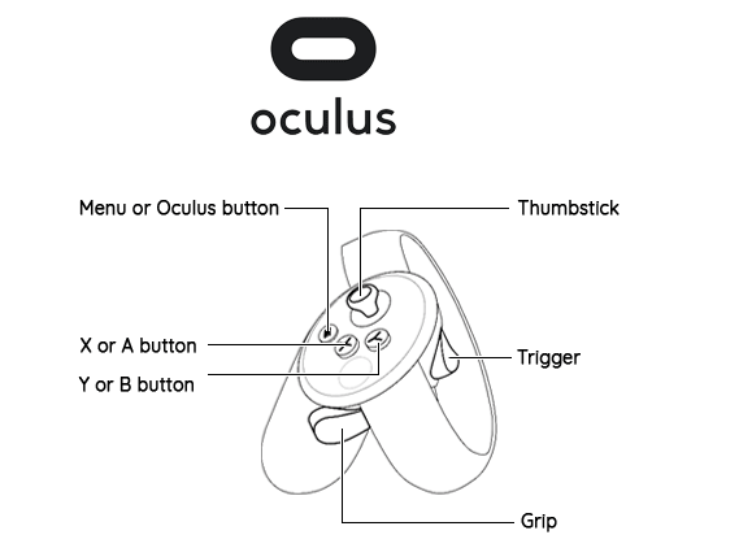
Thumbstick (primary hand): It can be used to scroll through (up and down) lists
Thumbstick (secondary hand): It can be used to undo/redo a painting action (when in paint mode) by moving left (to undo) and right (to redo after undoing).
Menu button: This should NOT be pressed, it is a Oculus function unrelated to our software
Grip button: For navigation. Hold the button down with one hand, this ‘grabs’ the cube, and you can move it around with hand/arm motion
Grip button on both controllers: Press the grip buttons on both controllers to zoom in and out (arm motion in/out along horizontal axis), and rotation (hand/arm motion that is a scissor motion).
“Y” or “B” button: It activates the quick menu option (see Graphical User Interface). If the primary hand is set to be the left hand then the reference button is the “Y” button; if the primary hand is set to be the right hand then the reference button is the “B” button.
“X” or “A” button: It activates the selection option. Use this to create a box around a region (e.g. a source) of choice. How to use this: you reach your hand behind and upward of the object (in 3D), press and hold button as you drag it across and down the source, creating a box within which your regiond of interest should be. After you have selected the source, you can crop the box using either a voice command “Crop Selection” or the Crop button in the Quick Menu. If the primary hand is set to be the left hand then the reference button is the “X” button; if the primary hand is set to be the right hand then the reference button is the “A” button.
Trigger: It is used for a number of actions:
Once a menu is active a laser pointer will be visible. The trigger can then be used to select options on menus.
When the voice command “Edit min” or “Edit max” or “edit z* axis” (see section Voice commands) are activated, the user can change the min/max thresholds or tune the z-axis, by moving up/down or right/left the primary hand respectively. In both cases, when the user is happy with the new threshold or z-axis, they can use the trigger to save the new configuration.
Voice commands
In VR, the use of the controllers can become tricky, so we have implemented a series of voice commands that can be used as an alternative to interact with the data. The list below contains all the possible voice commands that can be used instead of the options in the VR quick menu. Each of the following commands will have the exact same outcome as the menu actions. A successful voice command is indicated by haptic feedback (vibration) on the primary hand controller. If no feedback is received, then the voice command did not activate and the user should try again.
Tip
It is possible to switch the voice commands to only activate when a button on the controller is pressed. This is useful in noisy environments. Change the usePushToTalk setting in the configuration file to true, and voice commands will then require the secondary button on the primary controller to be held down to function.
Command |
Description |
|---|---|
Changing voxel thresholds |
|
“Edit min” |
Set the minimum threshold (floor) of the voxel intensity mapping. |
“Edit max” |
Set the maximum threshold (ceiling) of the voxel intensity mapping. |
“Save threshold” |
Sets the threshold values after editing (equivalent to pressing the front trigger button). |
“Reset threshold” |
Reset the thresholding to the default (startup) values. |
Changing colour map |
|
“colour map plasma” |
Set the colour map to a preferred one. Options are: cube helix, inferno, magma, plasma, rainbow, turbo, viridis.* |
“reset transform” |
Reset the colour mapping to the default colour map (inferno). |
Changing ray marching settings |
|
“projection maximum” |
Utilise ray-marching with maximum voxel intensity algorithm. This takes the maximum value along the line-of-sight for applying the colour map. The algorithm can be found at this location in the iDaVIE shader code. (DEFAULT) |
“projection average” |
Utilise ray-marching with average along line-of-sight algorithm. This takes the average value of the voxels along the line-of-sight for applying the colour map. The algorithm can be found at this location in the iDaVIE shader code. |
Changing downsampling settings |
|
“sampling mode maximum” |
Switch downsampling to use the maximum value in a region. (DEFAULT) |
“sampling mode average” |
Switch downsampling to use the average value in a region. |
Changing voxels scale |
|
“linear scale” |
Display voxel values in square root scale. (DEFAULT) |
“log scale” |
Display voxel values in log scale. |
“square root scale” |
Display voxel values in square root scale. |
Changing cube size scaling |
|
“edit zee axis” or “edit zed axis” |
Edit the z-axis of the cube (i.e., to compress the cube to a single layer or stretch it). NOTE: No beam convolution is taken into account when performing this action. We assume that every channel has the same beam size. Use the moment maps (moment zero and moment one are available) if you wish to see a proper convolution with beam sizes taken into account. |
“save zee axis” or “save zed axis” |
Save the new z-axis scale. |
“reset zee axis” or “reset zed axis” |
Reset the z-axis to the default (initial) values. |
Selecting regions of interest |
|
“crop selection” |
After selecting an object or region of interest using the controllers, this command will crop the region within the box from the full cube and will render it at full resolution (depending on the size of the selected region). |
“reset crop” |
Return to the full cube view. |
“export sub cube” |
Save the selected area as a subcube in FITS format. |
Visualisation of cube masks |
|
“mask on” |
Show only those voxels that belong to the mask (requires that a mask be loaded). |
“mask off” |
Turn off the mask visualisation. |
“mask invert” |
The opposite of mask on; to show anything that is not in a mask, or, in other words, to show the “residuals” (cube - mask cube) – useful to find new sources. |
“mask isolate” |
Light up any masked voxels; use to easily see the mask. |
Painting options |
|
“paint mode” |
Activate the paint mode where the user can modify or create a mask. |
“exit paint mode” |
Exit paint mode. |
“brush add” |
Set the brush to add voxels to a mask. |
“brush erase” |
Set the brush to erase or delete voxels from a mask. |
“show mask outline” |
Show the mask outline as a transparent grid. (DEFAULT: the mask outline will be automatically set when in paint mode) . |
“hide mask outline” |
Hide the mask outline . |
“undo” |
Undo a paint mode action. |
“redo” |
Redo a paint mode action. |
“add new source” |
Specify the user is now adding a new source to the mask. |
“set source ID” |
Set the mask voxels the user is about to paint to the value of a specific source ID. With this command, the software will recognize the voxels as part of a specific source indicated and not as a new source. |
Screenshot options |
|
“take picture” |
Take a screenshot of what is in front of the user in VR. The screenshot taken will then be automatically saved as a .png file in
|
Catalog actions |
|
“teleport” |
When a source is selected in a list, this command will teleport the user to the position of the source in the cube |
“add to list” |
Add the active source to the new list (found in the sources window, third tab). |
Get cursor information |
|
“cursor info” |
Visualise any info available for the voxel where the cursor is. Default information is WCS, v_rad, volume value, voxel value in the units of the cube, frequency (if stored in the header), and source ID (if a mask is loaded). |
Note
A full list of colour maps is available from the quick menu, the options here are merely those available from voice commands.
Warning
We are aware that the voice commands do not work when the user is recording a movie using an external software. In this case the user should use the menu options. See more in the section “How to” demos.